Peace Lily Care: A Homesteader’s Guide to Indoor Bliss
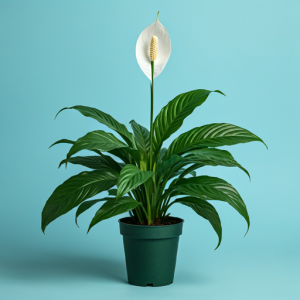 Welcome, fellow homesteaders! As I embark on my own journey of self-sufficiency, I’ve found that incorporating indoor plants not only adds beauty to my home, but also brings a sense of tranquility and connection to nature. The peace lily, with its elegant white blooms and lush foliage, has quickly become my favorite plant companion.
But I won’t lie, I was initially intimidated by the idea of caring for a houseplant. The thought of watering schedules and mysterious leaf browning seemed daunting! But fear not, my friends. After a bit of research and a lot of trial and error, I’ve learned that caring for a peace lily is surprisingly simple, even for a novice like myself.
In this guide, I’ll share my tips and tricks for keeping your peace lily happy and thriving. We’ll cover everything from basic care needs to troubleshooting common issues, all in a language that’s easy to understand and enjoyable to read. Let’s get started!
Getting to Know Your Peace Lily
The peace lily (Spathiphyllum) is not actually a lily at all, but a member of the Araceae family. This tropical beauty is known for its large, glossy leaves and striking white spathes (the modified leaves that surround the actual flower). The peace lily is a popular choice for beginners because it’s relatively low-maintenance and thrives in a variety of indoor environments.
One of the best things about peace lilies is that they purify the air! According to NASA research, they’re excellent at removing toxins like formaldehyde and benzene from the air, making them a great addition to any home.
Basic Care Guide for Your Peace Lily
1. Light
Peace lilies prefer bright, indirect light. Avoid direct sunlight, as it can scorch the leaves. A north-facing window or a spot a few feet away from a south-facing window is ideal.
You’ll know your peace lily isn’t getting enough light if the leaves are pale or yellowing, and if new growth is stunted.
2. Water
One of the most common mistakes beginners make is overwatering. Peace lilies prefer their soil to be slightly dry between waterings.
Here’s my simple watering routine:
- Check the soil: Stick your finger a few inches into the soil. If it feels dry to the touch, it’s time to water.
- Water thoroughly: Pour water into the pot until it drains out the bottom. This ensures that all the roots are properly hydrated.
- Empty the drainage tray: Excess water sitting in the tray can lead to root rot.
During the winter months, when growth slows down, you can reduce watering frequency.
3. Humidity
Peace lilies thrive in humid environments. If your home is dry, you can increase humidity by:
- Placing a humidifier nearby
- Grouping your plants together
- Setting a pebble tray filled with water beneath your pot
- Misting the leaves regularly
4. Temperature
Peace lilies prefer temperatures between 65°F and 75°F (18°C and 24°C). Avoid placing them near drafts or cold windows.
5. Fertilizer
Peace lilies benefit from regular fertilization during the growing season (spring and summer). I use a diluted liquid fertilizer about once a month.
Be sure to follow the instructions on the fertilizer bottle. Over-fertilizing can damage the roots.
6. Repotting
When your peace lily starts to outgrow its pot, it’s time to repot. The best time to repot is in the spring, before new growth starts.
Choose a pot that’s just slightly larger than the old pot, and use a well-draining potting mix.
To repot:
- Gently remove the plant from the old pot.
- Loosen any tightly packed roots.
- Place the plant in the new pot, adding potting mix around the roots.
- Water thoroughly.
Troubleshooting Common Peace Lily Problems
Here are some common issues you might encounter with your peace lily, along with solutions:
1. Yellowing Leaves
Possible causes:
- Overwatering
- Underwatering
- Poor drainage
- Lack of nutrients
- Chlorosis (iron deficiency)
Solutions:
- Adjust your watering routine, allowing the soil to dry out between waterings.
- Ensure that the pot has drainage holes and that excess water is drained.
- Fertilize regularly during the growing season.
- If chlorosis is suspected, use an iron-rich fertilizer.
2. Brown Tips
Possible causes:
- Low humidity
- Fluoride in water
- Over-fertilization
Solutions:
- Increase humidity levels by using a humidifier, grouping plants, or misting the leaves.
- Use filtered water or rainwater for watering.
- Reduce fertilization or use a weaker fertilizer solution.
3. Drooping Leaves
Possible causes:
- Underwatering
- Overwatering
- Low light
- Temperature stress
Solutions:
- Check the soil moisture and water accordingly.
- Ensure proper drainage and avoid letting the plant sit in water.
- Provide brighter, indirect light.
- Keep the plant in a temperature range of 65°F to 75°F (18°C to 24°C).
4. No Blooms
Possible causes:
- Lack of light
- Low humidity
- Overcrowding
- Nutrient deficiency
- Stress
Solutions:
- Provide brighter, indirect light.
- Increase humidity levels.
- Repot the plant if it’s becoming overcrowded.
- Fertilize regularly during the growing season.
- Minimize stress by providing consistent care and a stable environment.
5. Pests
Common pests:
- Mealybugs
- Spider mites
- Aphids
- Scale insects
Solutions:
- Isolate the infected plant from other plants.
- Use a neem oil spray or insecticidal soap to control the infestation.
- Manually remove pests with a cotton swab dipped in rubbing alcohol.
Propagation
Once your peace lily has become well-established, you can easily propagate it. This is a great way to start new plants and share with friends or family.
Here’s how to propagate peace lilies:
- Cuttings: Take a cutting from the stem, just below a leaf node.
- Remove the lower leaves: Cut off the leaves that will be submerged in water or soil.
- Propagate in water: Place the cutting in a jar of water, making sure the nodes are submerged. Change the water every few days.
- Propagate in soil: Dip the end of the cutting in rooting hormone and plant it in a pot filled with potting mix. Keep the soil moist and the cutting in a warm, bright location.
- Root development: Roots should develop in a few weeks. When the roots are about an inch long, you can pot the plant in a larger container.
Tips for Success
Here are a few extra tips to help you keep your peace lily happy and thriving:
- Don’t be afraid to experiment: Every peace lily is a little different, so adjust your care routine based on your plant’s needs.
- Be patient: It takes time for a new plant to adjust to its environment. Don’t be discouraged if your peace lily doesn’t bloom immediately.
- Enjoy the process: Caring for plants is a rewarding experience. Take your time, observe your plant, and learn from its cues.
Conclusion
Growing a peace lily is a wonderful way to bring a touch of nature indoors, improve air quality, and enhance your homesteading journey. By following these simple tips, you can ensure your peace lily thrives and brings joy to your home for years to come. Remember, patience, observation, and a little bit of love will go a long way in cultivating a thriving peace lily.
Happy homesteading!

